Astroブログに吹き出し機能を追加!吹き出しプラグイン実装
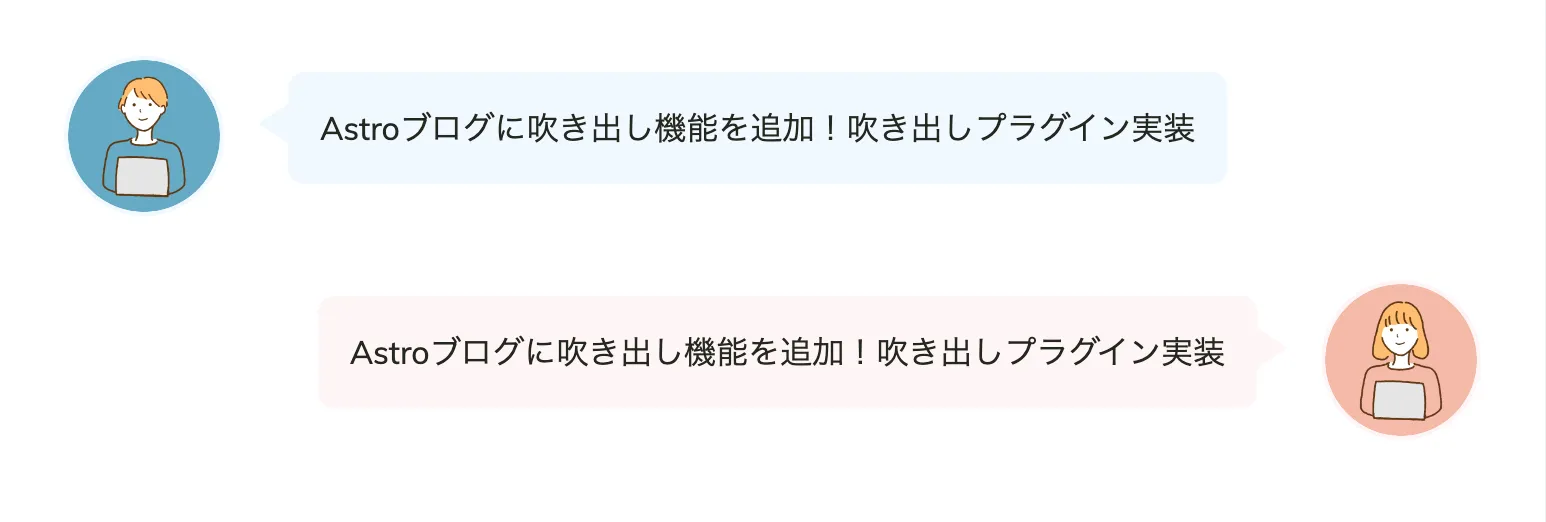
ブログを書く際に、以下のような吹き出しコンテンツを使いたくなる場面はないでしょうか?
自分は技術ブログで使うことはほぼないですが、ブログでレビュー記事などを書いている中で、吹き出しコンテンツを使いたくなる場面がありました。しかし、デフォルトの Markdown の記法の中で上記のような吹き出しコンテンツを表現する記法がなかったため独自の吹き出し記法を追加するために Remark プラグインを作成しました
本記事では、その吹き出しプラグインについてまとめています
プラグインではなくコンポーネントで吹き出しコンテンツを表示する方法も別途解説しているので、興味があれば読んでみてください!
Remarkとは
Remark とは Markdown を unist を拡張した mdast と呼ばれる抽象構文木として扱うプラグインのエコシステムのことです
unist や mdast などについて詳しくは別記事で触れているのでそちらをご覧ください!
今回は Markdown で吹き出しコンテンツを表現するために Remark プラグインを実装していきます
Markdown の記法を決める
まず、Markdown の記法を決めます。今回は Remark プラグインである remark-directive でディレクティブ記法を導入して使っていきたいと思います。ディレクティブ記法については、公式の README でも紹介されている CommonMark のドキュメントが参考になりますが、簡単に説明すると主に以下3つの記法が使えるようになります
:textDirective

::leafDirective

:::containerDirective
今回は、ディレクティブ記法の中の leafDirective を利用して、以下の記法で吹き出しコンテンツの HTML を表現できるようにしたいと思います
:::bubble
man Astroブログに吹き出し機能を追加!吹き出しプラグイン実装
:::

:::bubble
woman Astroブログに吹き出し機能を追加!吹き出しプラグイン実装
:::
↓
<div class="bubble left">
  <img src="/images/bubble-man.png" alt="bubble-man" width="80px" height="80px" loading="lazy">
  <p>Astroブログに吹き出し機能を追加!吹き出しプラグイン実装</p>
</div>

<div class="bubble right">
  <p>Astroブログに吹き出し機能を追加!吹き出しプラグイン実装</p>
  <img src="/images/bubble-woman.png" alt="bubble-woman" width="80px" height="80px" loading="lazy">
</div>
remark-directive を導入する
Markdown の記法が決まったので、プロジェクトにディレクティブ記法を導入するために remark-directive プラグインをインストールします
$ yarn add remark-directive
プラグインがインストールできたら、Astro プロジェクトの astro.config.mjs ファイルでプラグインを読み込みます
import remarkDirective from "remark-directive";
import { defineConfig } from "astro/config";

// https://astro.build/config
export default defineConfig({
  markdown: {
    remarkPlugins: [remarkDirective],
  },
})
導入ができたら、README の myRemarkPlugin を参考に試しにプラグインを作成してディレクティブ記法が使えるようになったか確かめてみます。今回は以下のような remarkBubbleContent というプラグインを作成しました
import { visit } from "unist-util-visit";
import { h } from 'hastscript'

export default function remarkBubbleContent() {
  return function (tree) {
    visit(tree, function (node) {
      if (
        node.type === 'containerDirective' ||
        node.type === 'leafDirective' ||
        node.type === 'textDirective'
      ) {
        console.log(node)
        const data = node.data || (node.data = {})
        const hast = h(node.name, node.attributes || {})

        data.hName = hast.tagName
        data.hProperties = hast.properties
      }
    })
  }
}
このプラグインを astro.config.mjs ファイルで読み込んで、mdx ファイルで以下のようにディレクティブ記法を使ってみます
:text

::leaf

:::container
containerDirectiveのテスト
:::
コンソール or ターミナルに以下のような mdast が表示されていたら、remark-directive の導入は完了です
{
  type: 'textDirective',
  name: 'text',
  attributes: {},
  children: [],
  position: {
    start: { line: 1, column: 1, offset: 0 },
    end: { line: 1, column: 6, offset: 5 }
  }
}

{
  type: 'leafDirective',
  name: 'leaf',
  attributes: {},
  children: [],
  position: {
    start: { line: 3, column: 1, offset: 7 },
    end: { line: 3, column: 7, offset: 13 }
  }
}

{
  type: 'containerDirective',
  name: 'container',
  attributes: {},
  children: [ { type: 'paragraph', children: [Array], position: [Object] } ],
  position: {
    start: { line: 5, column: 1, offset: 15 },
    end: { line: 7, column: 4, offset: 54 }
  }
}
Remark プラグインを実装する
ではここから実際に Remark プラグインを実装していきます。最終目標は以下のような Markdown 記法で QA コンテンツの HTML を出力することです
:::bubble
man Astroブログに吹き出し機能を追加!吹き出しプラグイン実装
:::

:::bubble
woman Astroブログに吹き出し機能を追加!吹き出しプラグイン実装
:::
↓
<div class="bubble left">
  <img src="/images/bubble-man.png" alt="bubble-man" width="80px" height="80px" loading="lazy">
  <p>Astroブログに吹き出し機能を追加!吹き出しプラグイン実装</p>
</div>

<div class="bubble right">
  <p>Astroブログに吹き出し機能を追加!吹き出しプラグイン実装</p>
  <img src="/images/bubble-woman.png" alt="bubble-woman" width="80px" height="80px" loading="lazy">
</div>
まず、先ほどテストのために実装した remarkBubbleContent で上記の記法を試すと以下のような mdast に変換されます
{
  type: 'containerDirective',
  name: 'bubble',
  attributes: {},
  children: [ { type: 'paragraph', children: [Array], position: [Object] } ],
  position: {
    start: { line: 2, column: 1, offset: 1 },
    end: { line: 4, column: 4, offset: 49 }
  }
}
{
  type: 'containerDirective',
  name: 'bubble',
  attributes: {},
  children: [ { type: 'paragraph', children: [Array], position: [Object] } ],
  position: {
    start: { line: 6, column: 1, offset: 51 },
    end: { line: 8, column: 4, offset: 101 }
  }
}
この mdast が目標となる HTML に変換されるように AST を変換させていきます
最終的な remarkBubbleContent プラグインは以下のようになりました
import { visit } from "unist-util-visit";

export default function remarkBubbleContent() {
  return function (tree) {
    visit(tree, function (node) {
      if (
        node.type === 'containerDirective' ||
        node.type === 'leafDirective' ||
        node.type === 'textDirective'
      ) {
        if (node.name !== 'bubble') return;

        const children = [];

        const classes = ["bubble"];
        const child = node.children[0];
        const text = child.children[0].value;

        if (child.type === 'paragraph' && text.match(/^man/)) {
          const textArray = text.split(' ')
          textArray.shift()
          const value = textArray.join('')

          children.push({
            type: "element",
            tagName: "img",
            properties: {
              src: "/images/bubble-man.png",
              alt: "bubble-man",
              width: "80px",
              height: "80px",
              loading: "lazy",
            },
            children: [],
          })
          children.push({
            type: "element",
            tagName: "p",
            properties: {},
            children: [{type: 'text', value: value}],
          })
          classes.push("left")
        }

        if (child.type === 'paragraph' && text.match(/^woman/)) {
          const textArray = text.split(' ')
          textArray.shift()
          const value = textArray.join('')

          children.push({
            type: "element",
            tagName: "p",
            properties: {},
            children: [{type: 'text', value: value}],
          })
          children.push({
            type: "element",
            tagName: "img",
            properties: {
              src: "/images/bubble-woman.png",
              alt: "bubble-man",
              width: "80px",
              height: "80px",
              loading: "lazy",
            },
            children: [],
          })
          classes.push("right")
        }

        node.data = {
          hName: "div",
          hProperties: {
            class: classes,
          },
          hChildren: children,
        };
      }
    })
  }
}
各タグのスタイルについては各自でお好きなように実装してください
Astro にプラグインを導入する
上記で実装した remarkBubbleContent プラグインを astro.config.mjs で読み込みます
import remarkDirective from "remark-directive";
import remarkBubbleContent from "./src/plugins/remarkBubbleContent";
import { defineConfig } from "astro/config";

// https://astro.build/config
export default defineConfig({
  markdown: {
    remarkPlugins: [remarkDirective, remarkBubbleContent],
  },
})
読み込みが完了したら再度ページを読み込みます。すると以下のように吹き出しコンテンツが表示できます

Astroブログに吹き出し機能を追加!吹き出しプラグイン実装
Astroブログに吹き出し機能を追加!吹き出しプラグイン実装